
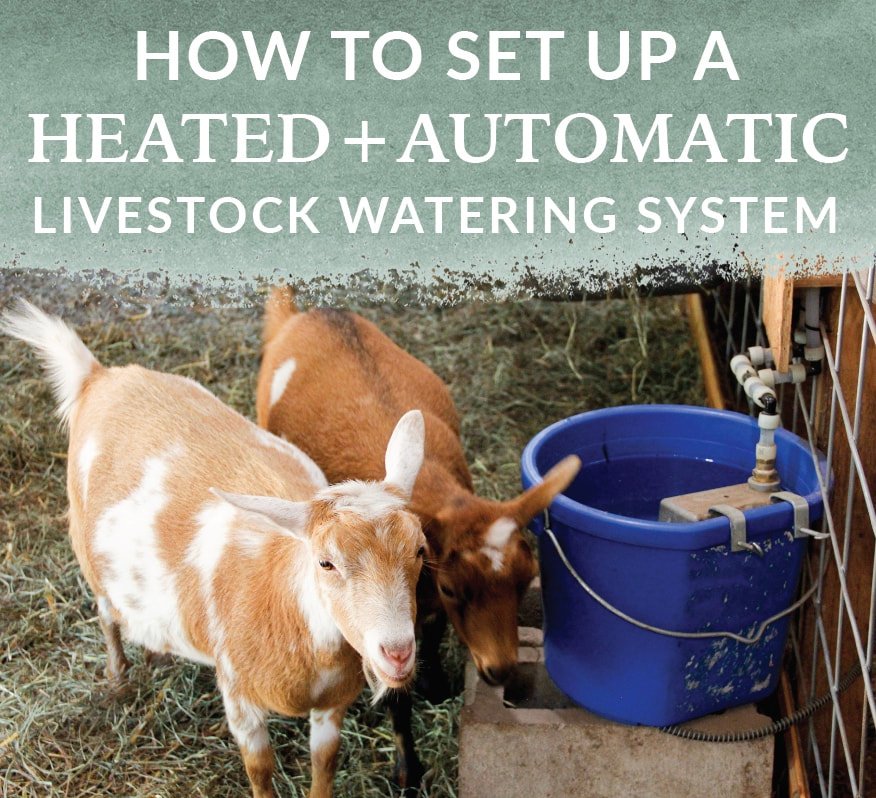
 Installing an automatic heated livestock watering system in our barn for our farm and homestead has been one of the biggest game-changers in reducing labor effort, maintaining cleanliness, and, most importantly, combating Old Man Winter’s relentless effort to freeze everything in sight through our cold Wisconsin months. In this post, we will cover absolutely everything you need to know on how to build and install your own automatic heated livestock watering system for your barn - including plumbing supplies, heating elements, and step-by-step instructions for installing the automatic watering system. Please note: Some of the links below are affiliate links, meaning at no additional cost to you, I will earn a commission if you end up clicking and purchasing an item. I worked hard to find my trusted favorites and I want to share them with you so you don't have to deal with all the crappy junk I had to go through. Nuff said. 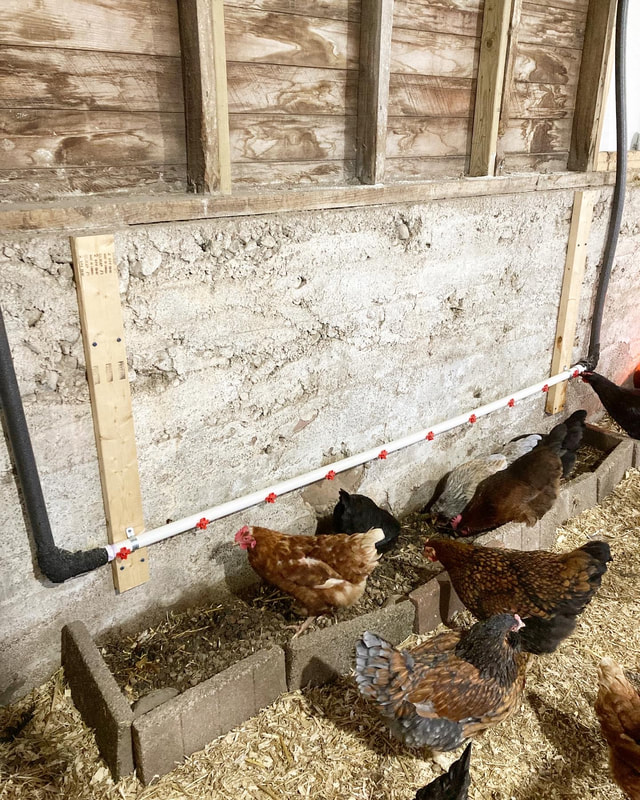 Why we decided to install a heated automatic livestock watering systemPreviously, we had manually filled water buckets using hoses and a water supply from our house, which was over 100’ away from where we needed it. Our water automation efforts started long before the system we’re about to dive into and included running electric and water lines from the house out to our barn (a whole other project). Before installing our automated watering system, our daily ritual would entail hauling buckets of water to our chickens and goats. In the summer months, we would exchange water in the buckets upwards of 2 - 4 times per day (which you could call easy work compared to what we had to do in the winter). In the winter, as many of you know, everything is more complicated. While water consumption is less in the winter, we had to develop processes to ensure our water supply didn’t freeze, which were tedious and semi-reliable at best. We preferred to use a hose to distribute the water to the various buckets we had, but more often than not, if we didn’t lay the hose out just right (our yard is sloped so it could drain), it would freeze and become useless so we would end up hauling buckets from the house to the barn. There's nothing like spilling water on yourself in sub-zero temps as you haul it across the yard! 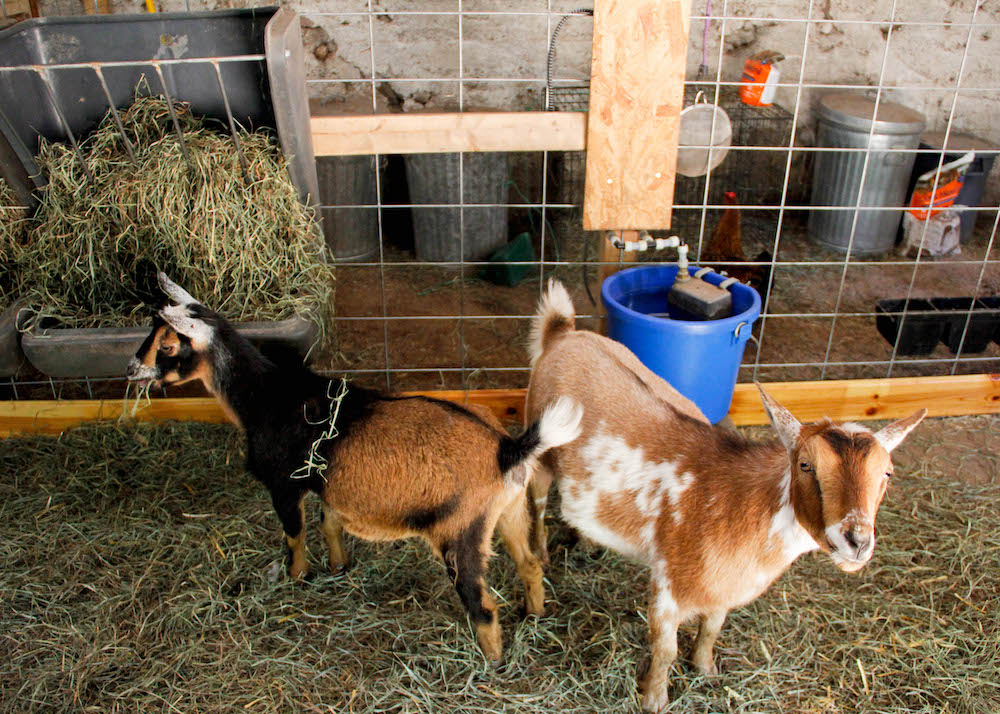 Automatic Heated Livestock Watering System Overview First, let's walk through the various parts of the system and how they work. Then we'll walk through the specific materials we used with pictures, the heating and pump elements we like best and why, and the electrical requirements needed for the watering system. Note: The system we designed is configured to work either with a dedicated water inlet supply or an intermittent one (you fill the automated system up periodically as the animals consume the water). The main differentiator will be how large you need to make your buffer/storage tank.  1. Incoming Water LineAssuming you have a dedicated water supply, you will have an incoming water line feeding the system, which is ½” or ¾”. 2. Float ValveA float valve is used to regulate the water supply feeding the buffer/storage tank. If you don’t have a dedicated water supply items 1 and 2 won’t be part of your system. 3. Buffer/Storage TankThe buffer/storage tank is the heart of the automated system. Its size is dependent on the number of services (water buckets, chicken nipples, etc.) and whether or not you will be incorporating a dedicated water inlet supply. The tank should be insulated in most cases to prevent unnecessary heat loss. The only time you may not want to insulate your tank is if you are putting the tank in a heated room. We put our tank in a room we occasionally heat but still insulated it. The tank also houses the tank heater, thermostat, and circulation pump. Most importantly, the tank serves as a separator from your “potable to humans” water inlet supply and the recirculating water provided to your animals. 4. Heating ElementI opted to heat the water running through the circulation loops in the winter for a couple of reasons. First, heated water serves as an extra layer of protection in the event the circulation pump fails during the winter. Second, chickens and goats are more apt to drink warm water during the winter than cold water. 5. ThermostatI incorporated a thermostat that controls the heating element so you can fine-tune the temperature of the water you’re providing your animals. In this system, the water temperature can be controlled up to 110*F. 6. Circulation PumpThe circulation pump moves water through the system and is the main defense against freezing in the winter months. The constant water flow also helps significantly reduce the likelihood of bacteria or algae buildup within the system. Both bacteria and algae are most likely to develop in areas of stagnation which is why constant flow is so beneficial. 7. and 8. Outlet and Return LinesThe main circulation loop consists of an outlet and return line. Branching off of these lines will be service loops. For most systems, ½” pipe will supply more than enough water to various service loops. For increased thermal performance, the lines can be insulated with pipe insulation to reduce heat loss. 9. Service Loop and Shut-Off ValvesEach service loop consists of an independent water line run to the service, i.e., bucket, nipple waterer, etc., and three shutoff valves. The shutoff valves are used to temporarily disable the loop and redirect flow for cleaning, draining, or any time that particular loop isn’t needed. In normal operation, the two valves in line with the supply and return to the service loop are open, while the valve positioned on the main supply line is closed. Service loops are typically ½” pipe. 10. Livestock Water Bucket or TroughThis water bucket/trough part of the system can be used for sheep, goats, cattle, horses, livestock guardian dogs, and pigs. For our goats, we utilize a large bucket that draws water from the system and uses a float valve to regulate the water level in the bucket. Once heated water leaves the circulating system, it has no means to retain or obtain more heat, so we opt to use a bucket with a built-in thermostatically controlled heater. The heater offers freeze protection and makes for happy goats. We opted not to return this water into the system since the goats introduce many contaminants into the water (saliva, hay, straw, poop, etc.). 11. Chicken Nipple WatererFor our chickens, we built a recirculating nipple waterer loop that allows the chickens fresh warm water at all times. The beauty of nipples is that they act as a one-way valve, and it is very hard for contaminants to enter the circulation loop. This system is by far the most hands-off chicken watering solution we’ve ever had. 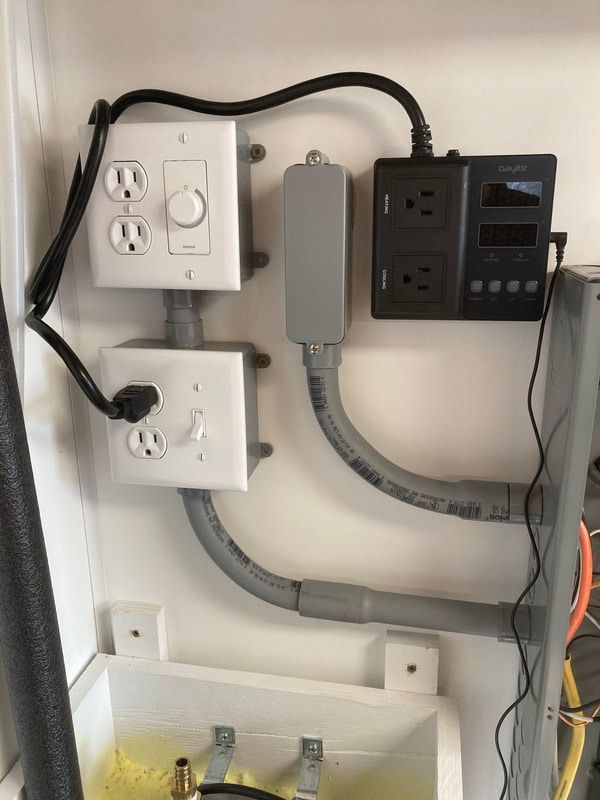 Electrical Requirement for the Automatic Heated Livestock Watering SystemWhat does a system like this need for electrical power? At a minimum, you need two 15 amp receptacles to power the circulating pump and thermostat/heating element. On our system, I installed switched receptacles for the circulating pump and the thermostat/heating element so that I could flip a switch instead of unplugging them. I also installed these receptacles on independent circuits so that if the heating element failed and tripped the circuit, my circulating pump wouldn’t stop running. If you read the installation requirements for your pump and heating element, you’ll likely find that they call for GFCI outlets. In our system, you can see that I didn’t install GFCI receptacles. The main reason is that these outlets are the only receptacles on their respective circuits. That said, I’m not an electrician, nor am I endorsing my methodology. You should consult a professional and adhere to your local codes when it comes to electrical work. Lastly, you’ll see that I installed a variable speed switch to control my pump. After testing the pump with the variable speed controller, I can say that the pump isn’t configured to run well at variable speeds. Therefore, an on/off switch should be used. 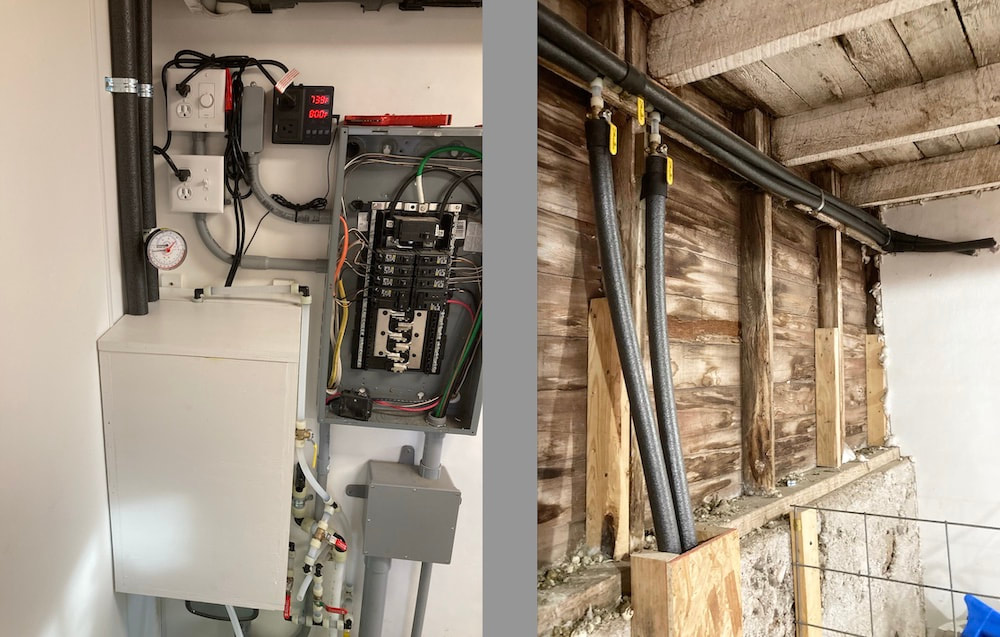 The Best Materials and Elements We Found For The Automatic Livestock Watering SystemFirst and foremost, from a design standpoint, the goal of any automated watering system should be a reliable, trouble-free supply of water to your animals. I can’t stress enough the importance of reliability. Can you imagine waking up to your whole watering system being one giant ice cube in the dead of winter? These components need to work around the clock, have some built-in redundancy, give you peace of mind, be easily serviceable, have a means of being monitored, and the system shouldn’t cost you a fortune. Let’s go down the list and walk through what you need, what we used, and why! 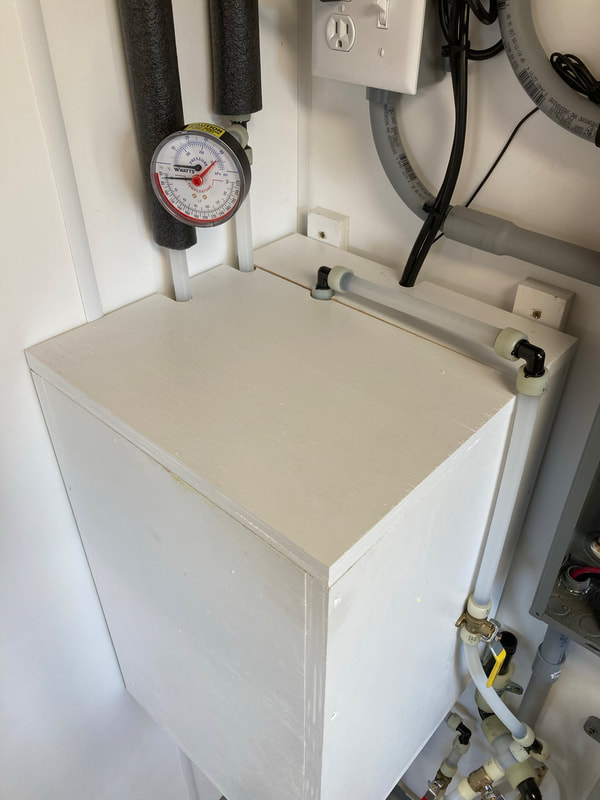 1. Water Inlet Supply OptionsYour water inlet supply can be ½” pipe or greater. To connect with your float valve, you’ll need an adapter and possibly a reducer if your inlet pipe is bigger than ½”. 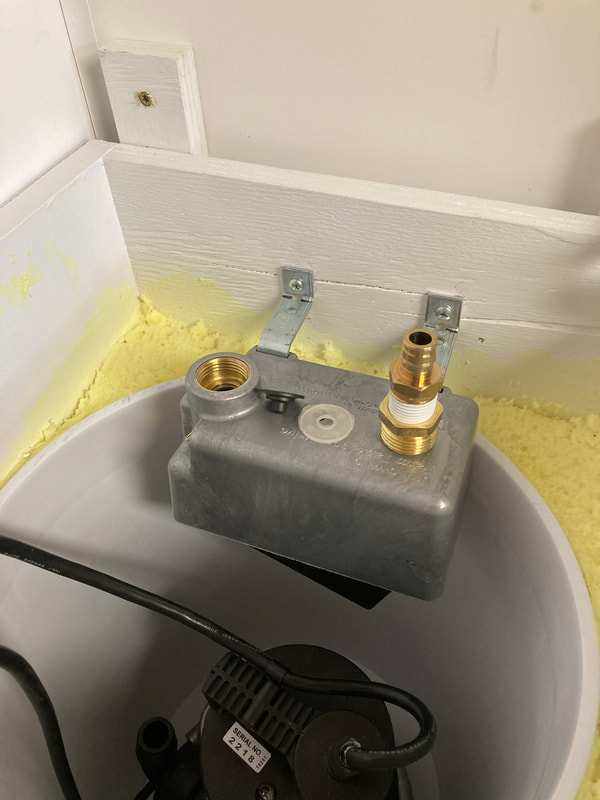 2. Float Valve: Dare Products 1780 Float ValveI selected this one because it was made mostly of metal, came with three different orifices for controlling how fast the tank or bucket filled, and had good reviews. Most importantly, after looking at its design, I felt confident I wouldn’t walk out to an overflowing buffer/storage tank on a random day. So far, I have two of these valves, and they have worked flawlessly for over six months. Most float valves accept a male garden hose thread (MGHT), so you can hook a hose directly to the valve or, if you’re running a dedicated water supply, you’ll likely need an adapter fitting to convert from whatever your water supply is to connect to the float valve. 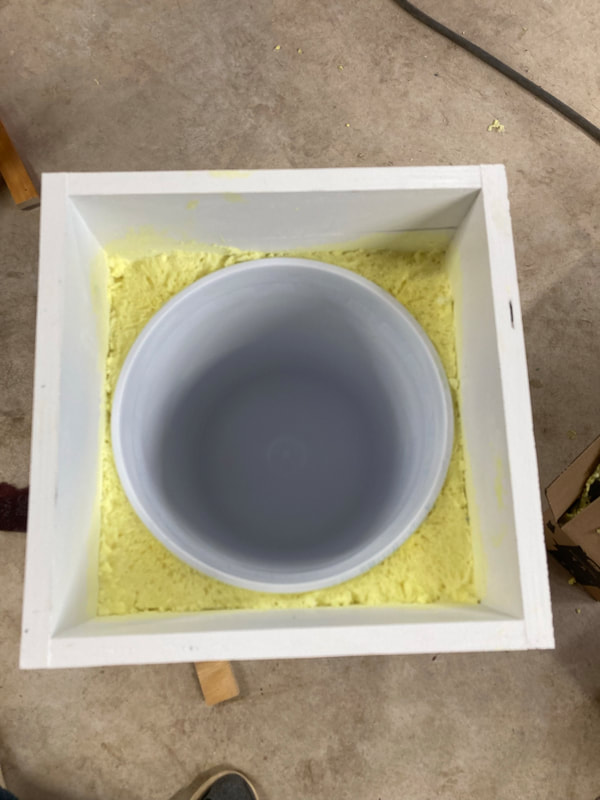 3. Buffer/Storage Tank: five-gallon bucketThere are two sizing scenarios to consider for an automated watering system. First, if you have a water inlet supply, the buffer/storage tank can be sized more conservatively. In our system, I used a five-gallon bucket as the tank, built a box around it, and then insulated it with spray foam. I selected five gallons as the tank size for a few reasons. First, I needed a relatively small tank size because I was installing it in our barn room in a spot that was already space limited. Second, five-gallon buckets are cheap. Lastly, heaters for heating five gallons of water are readily available and don’t require a lot of electricity. After installing the tank and fitting everything, I can say that five gallons is just about the minimum size you can go with to fit the heating element, circulating pump, and return line. 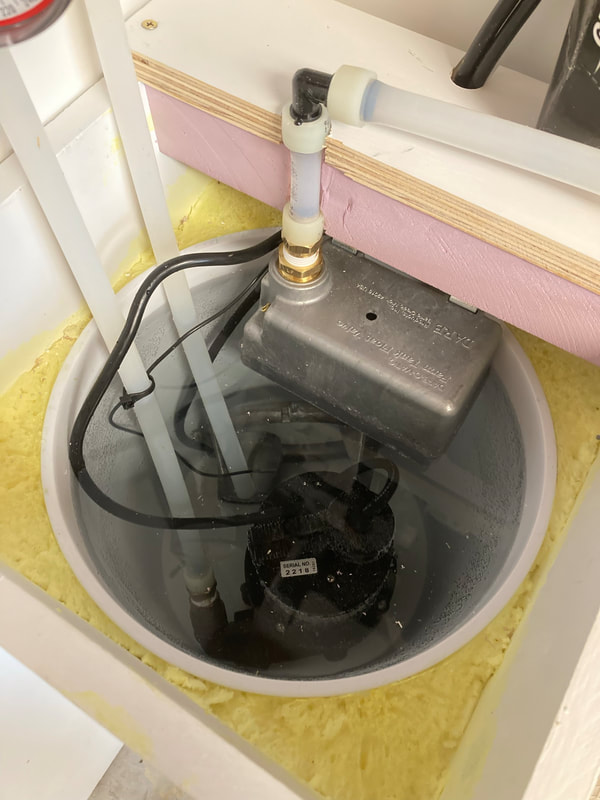 From the buffering standpoint of the tank, you have to decide how much excess capacity you want your system to have. The point of having a buffer tank, in addition to having a space to pump and recirculate water, is to have a source of water that can accommodate excessive demand loads. For example, if you have a 15-gallon buffer tank and three five-gallon water buckets for your animals and all the water buckets get tipped over, then your buffer tank could be on the brink of capacity, depending on how fast your system tries to fill up each water bucket. You are basically trying to plan for and avoid situations where your water services can drain down your buffer tank to the point where the circulation pump draws air and starts to cavitate (stop pumping). In our system, we only have a goat water bucket and chicken nipple waterer loop to service, so we don’t need a ton of excess. Additionally, I have set up the float valve feeding the buffer tank to fill faster than the float valve supplying our goat waterer, so it’s unlikely our services will ever deplete our supply. That said, much of the need for a large buffer tank in an automated system with a dedicated water supply can be mitigated by carefully metering the rate at which water services are replenished. In the second scenario, you are designing an automated system where you’ll intermittently fill your buffer/storage tank as the water level decreases. In this case, you will need a more generously sized tank so that you aren’t filling it all the time. My recommendation on sizing a tank in this situation would be to estimate the volume of water your livestock consume each day and then multiply this estimate by the number of days you want to go without refilling your buffer tank. Take this number and then add some factor of safety, say 30%, on top of it to ensure your pump always has water to circulate. 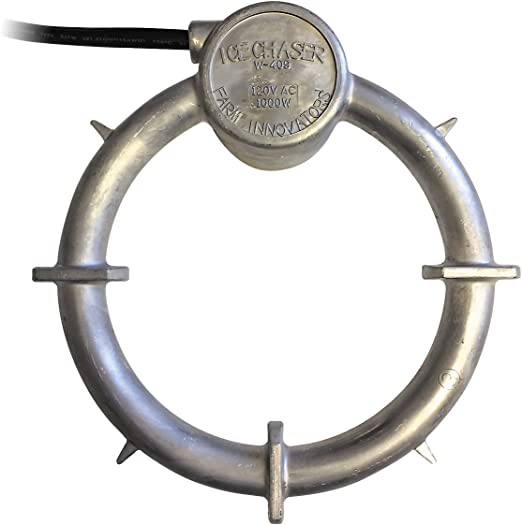 4. Heating Element: Farm Innovators W-409 1000 watt bucket heaterI picked this unit foremost because it has a built-in thermostat that kicks in between 100 - 110 degrees F. The reason I wanted this was so that I could install my own thermostat that regulates the water temperature at a much lower set point but still have a second fail-safe if my main thermostat fails. Many of the heating elements I researched either didn’t have a built-in thermostat (yikes), or the thermostat turned on just above freezing temps so the water would never get very warm. I also went with Farm Innovators because the brand seems more established and reputable than the generic knockoff brands you see all over Amazon. 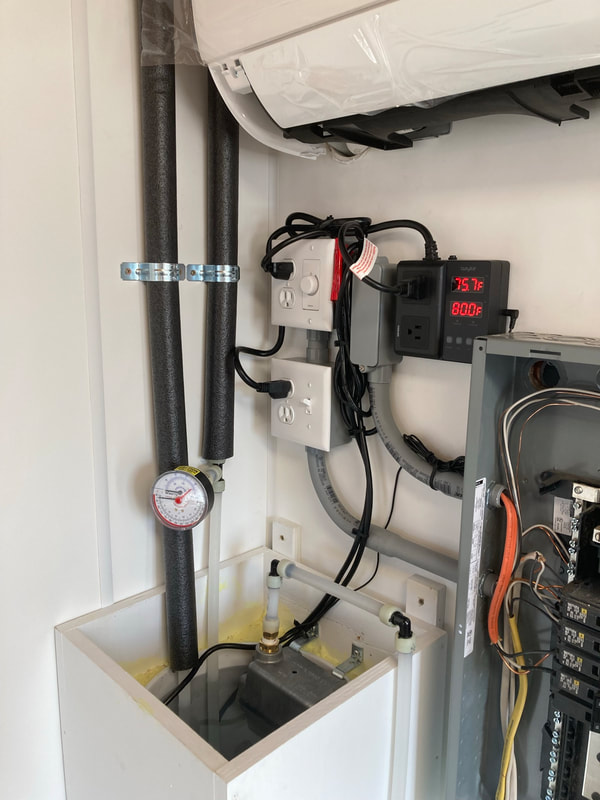 5. Thermostat: Bayite 1650 watt 15 amp thermostat controllerThis is an easy-to-use plug-and-play unit. You basically just plug our heating element into this unit and plug the unit into your power source, and then set the temp you want. A nice feature I really like is that it has an easily readable screen that displays the water temp in the buffer tank at all times so you can keep tabs on the system. Having no initial experience with this brand, I bought it based on the positive Amazon reviews and because it meets all the requirements for controlling the water temp. 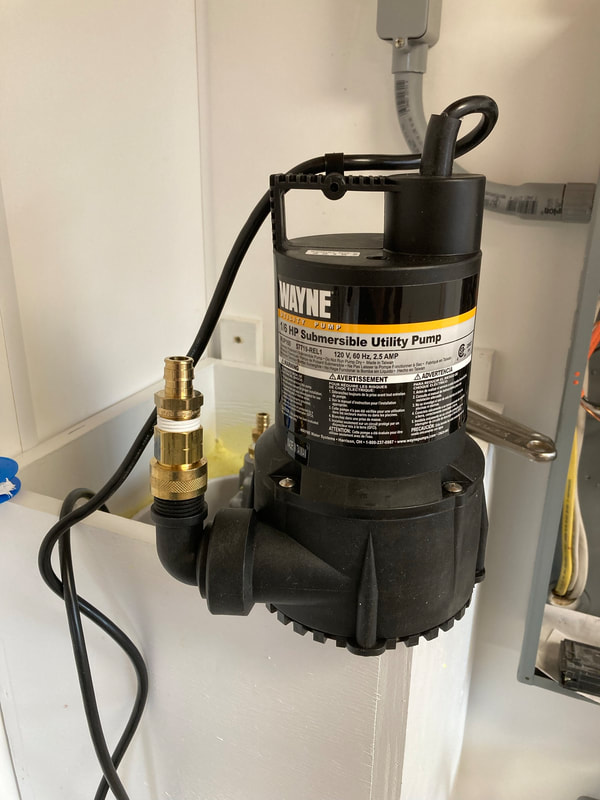 6. Circulation Pump: Wayne 57719-REL1 RUP160 1/6hp utility pumpArguably the hardest part of designing an automated watering system is sizing the circulating pump correctly. I opted to use a utility-style pump for my circulating pump because they are affordable and durable. Ideally, you’d want to select a circulating pump used in a radiant floor system; however, these pumps are very expensive, which for me made them a no-go. Sadly, unlike circulating pumps for radiant systems, most other pumps don’t have meaningful information on how much water they circulate, commonly known as pump flow curves. Instead, they often tell you how much water they can pump (gallons per hour, gph) out of a basement and up a hill (discharge height). Since there isn’t any pump info that directly correlates to circulating systems, you end up having to take a blind swing at the best pump. Your goal is basically to select the lowest power-consuming (amperage) pump with a fairly low flow rate, so you aren’t wasting and paying for electricity to pump water in excess around your circulating loops. Most importantly, though, you need a pump that you can count on because it needs to run 24/7 without fail. I went with a Wayne 57719-REL1 RUP160 1/6hp utility pump. The specs on the pump are impressive if you’re pumping out a flooded basement and, in all honesty, in excess of what my system requires; however, it has run continuously for half a year now without fail. I’m confident this pump would work well for you whether you’re installing a similar size or a much larger system. The pump features a 1 ¼” discharge and includes a ¾” garden hose adapter so you can configure your water lines to whatever size you need for your system. In my system, I reduced the ¾” garden hose adapter to ½”, which helped further reduce the flow rate. A final point on pump selection - you might find fish tank style pumps attractive due to their price (the YouTube farmers love them); however, if you read reviews, look at how/where these pumps are made and consider that they aren’t intended to be circulation pumps you want to stay away from them. Personally, I couldn’t imagine risking a system freeze so that I could save a few bucks on a generic fish tank pump with suspect reliability. 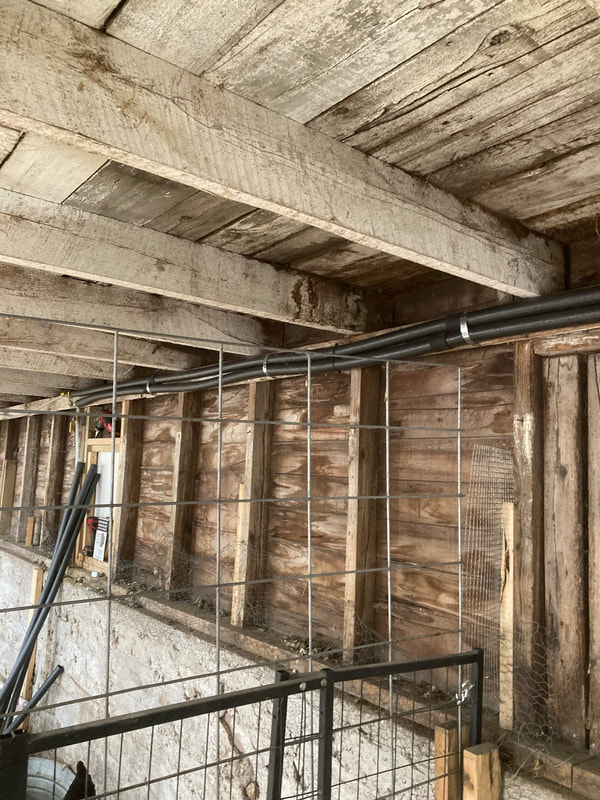 7. and 8. Outlet and Return Water LinesWhat size should your lines be? As small as possible. The amount of flow you need in a circulating system isn’t very high, so large lines aren’t usually required and add cost to the project. For most applications ½” pipe should work well. Keep in mind that as your circulating loop increases in length, the flow will reduce due to friction within the pipes. Also, the circulating system operates with almost no pressure, so the flow will be much less than in a pressurized system. If you’re concerned about flow, you can consult water pipe flow charts to estimate what flow you can expect from your selected pipe size. What’s the best pipe material? I would recommend PEX tubing for your system because it is much cheaper than copper and it can tolerate freezing much better. As a testament to the durability of PEX tubing, I’ll share that towards the end of the winter this year our barn room froze solid because someone forgot to shut a door. As a result, all of our PEX plumbing froze solid, except for the buffer tank and recirculating lines. It took over eight hours to unthaw everything, and in the end, no plumbing was damaged. Should you use pipe insulation? I opted to install pipe insulation over all of my lines to prevent heat loss. This was something I wanted to do from the onset but did not perform any sort of cost-benefit analysis to determine if the cost of the insulation would pay back vs. the added heating costs that occur from extra heat loss through an uninsulated pipe. If you want to insulate your pipes, you can get pipe insulation relatively inexpensively. 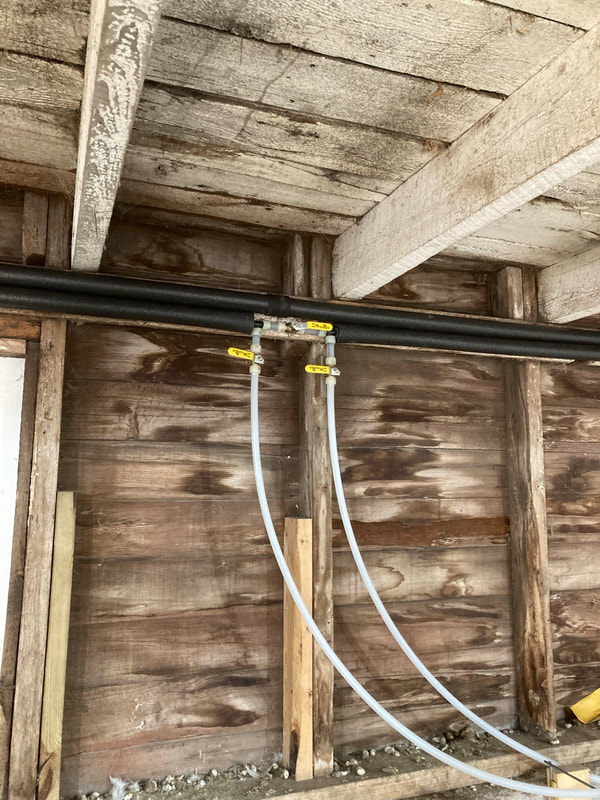 9. Service Loop Lines½” pipe should work well for the service loop lines. Keeping the service loops common with the main loop will reduce the number of reducers and fittings you need to buy for each line size. For shutoff valves, I recommend ball valves with handles so that you can easily turn them on and off. 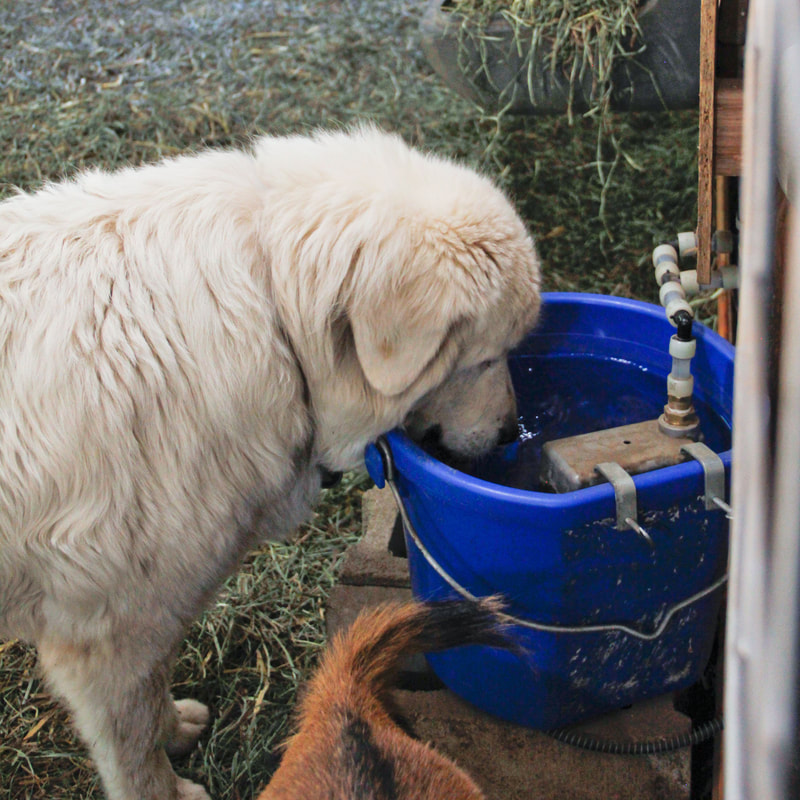 10. Heated Watering Bucket/Trough: Farm Innovators Heated 5-gal BucketWe've had various heated watering buckets over the years and we've found this brand to be the most reliable. They offer various sizes as well at this link. 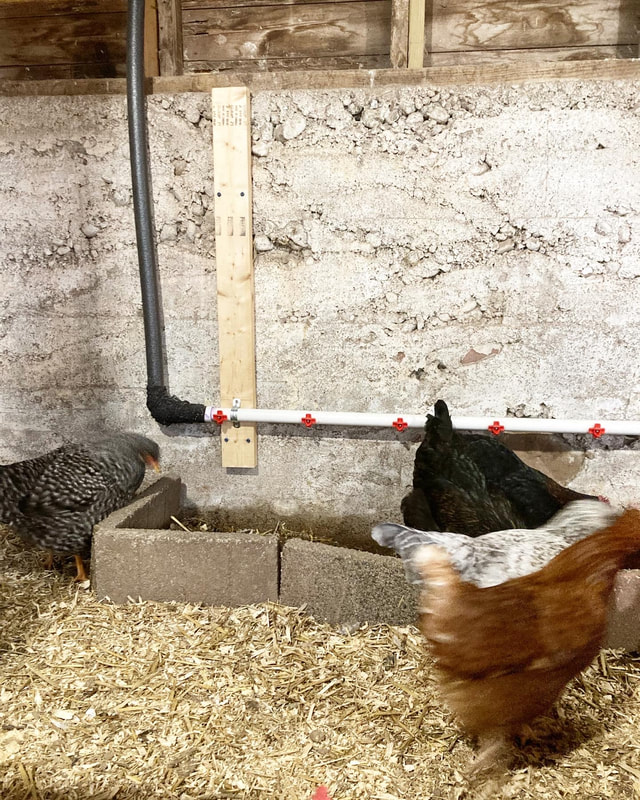 11. Chicken Nipples: Freeze-Proof Chicken Nipple Waterer PackTo make the chicken nipple waterer loop, you’ll need a piece of PVC pipe, adapter fittings, and chicken nipples. You can get various sized packs of chicken nipples at this link. Frequently Asked QuestionsHow much does the heated automatic livestock watering system cost? How much your automated watering system will cost will be partly dependent on the size of it, the number of services you incorporate into it, and of course, current market conditions for building materials (don’t you just love these massive price swings?!). As an example, our system with two service loops and a dedicated water supply costs just over $400 in materials. How long did it take to install the watering system in the barn?As for installation time, I spent 2 - 3 days installing the system. Installation times will obviously vary depending on the size and complexity of your installation. How is the automatic watering system holding up after one year of use?We have had absolutely no issues in the year since we've installed it. Like I mentioned, the only snafu we suffered was the barn door getting left open on a cold winters day and our PEX plumbing froze solid, except for the buffer tank and recirculating lines. It took over eight hours to unthaw everything, but in the end, no plumbing was damaged! Do you have issues with the chicken nipples dripping?I've never run into a chicken nipple that doesn't drip a little here and there. We put down a layer of rock underneath the chicken line and set up a barrier out of cinder blocks to keep bedding from getting wet. Was it worth it?Absolutely! Speaking as a farm owner that does not enjoy repetitive laborious tasks that can be automated, this was a must-do! We can leave the animals in the summer and know with certainty that they have plenty of water. In the winter, I don’t have to thaw frozen buckets, haul water from the house, and in general, we have our water needs set on autopilot. Perhaps most importantly, we can take the time we used to spend messing around with watering and re-allocate it to more value-added activities - like snuggling our goats!  Did you like this post? Check out my other posts about homesteading here!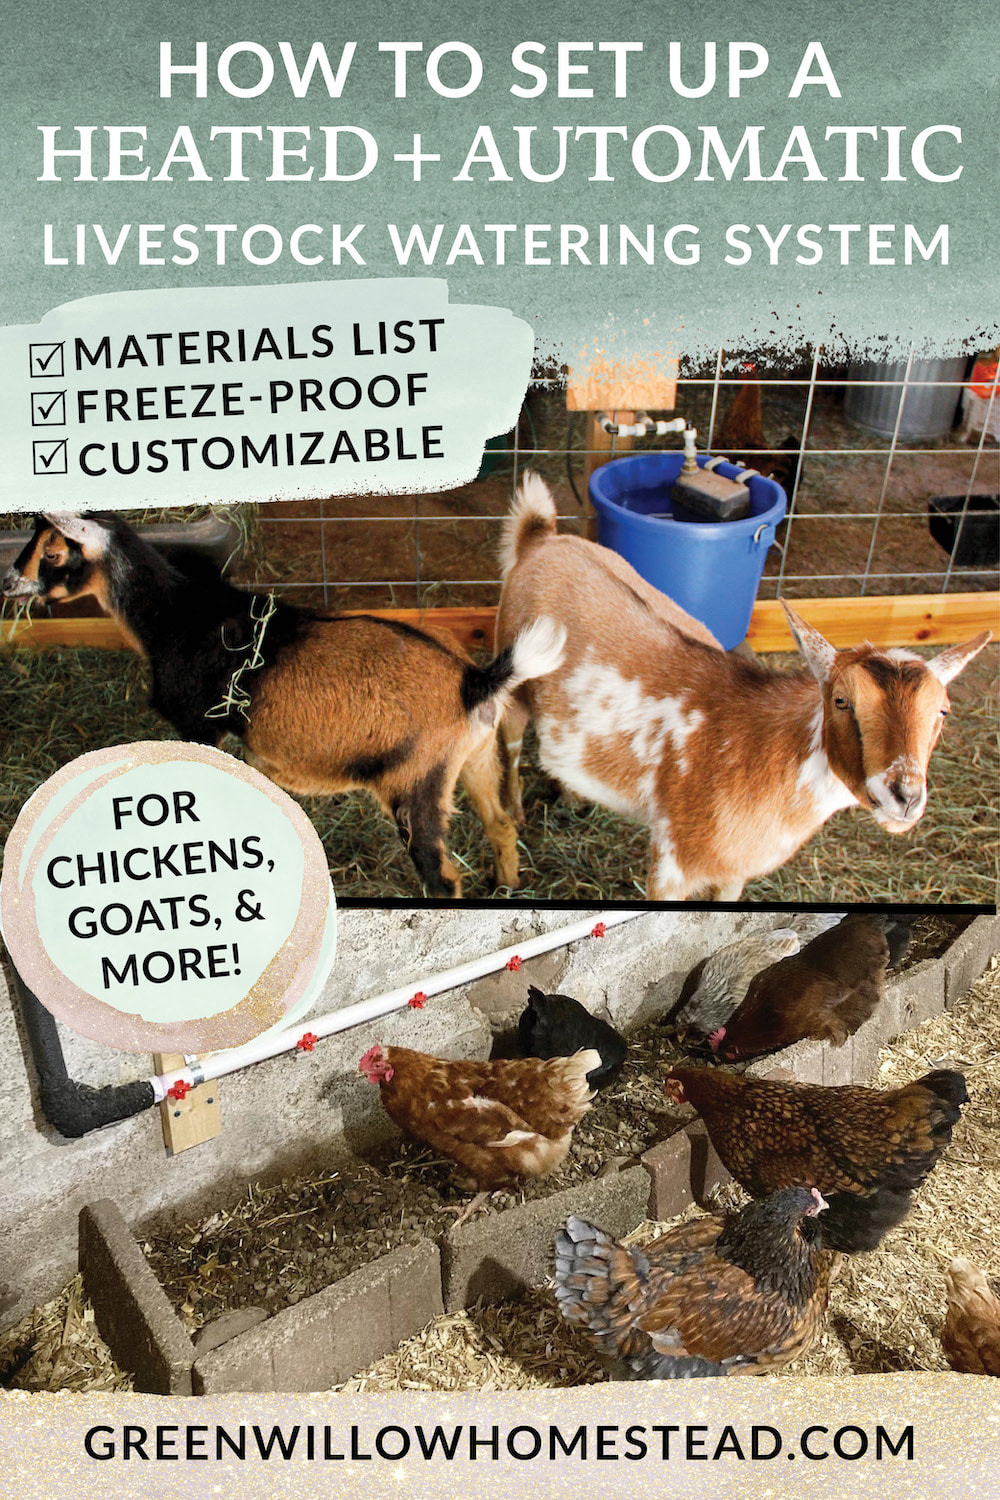
8 Comments
Michael McDaniel
12/29/2022 01:52:47 pm
Amazing! Well designed and executed. I can not believe there are not thousands of 'likes' (Comments) on this great article. I have built a similar set up, sort of.
Kelsey
12/29/2022 04:49:19 pm
Thanks Michael! We think so too! Hopefully Google starts to pull our article to the top for others. :) Hope your set up is working well for you!
Crysta
2/9/2023 06:53:24 pm
It did for me!! First result on my first search and EXACTLY what I was looking for! Excited to build our system this weekend! Thank you for showing that it works!
Laura
10/19/2023 04:37:07 am
I do have one question- how difficult is it to change-out the water in the heated bucket? I am mainly asking for our hogs as they have super dirty snouts most of the time & require their bucket to be dumped, rinsed & refilled...
Mike
2/22/2023 08:09:11 am
I'm very interested in doing something like this for my chickens. How much do you think this increased your electric bill?
Kelsey
2/22/2023 09:28:33 am
Hi Mike - comparing our electric usage in 2020 before we installed it to now, it's a difference of about $10 a month - not bad at all in my book!
Laura
10/19/2023 04:32:57 am
Thank you so very much for taking the time to post all of this. We moved in April to a homestead & are converting a 9-stall horse barn into our barn for goats, hogs, chickens & turkeys. There was water service to the barn, but it was terminated at some point. So, we were trying to figure out how to get water service into stalls without having to trench (and go under concrete areas) but also keep the water from freezing in the winter. Our previous set-up also required hauling water from the kitchen sink!!!! So, THANK you for this idea! Our plumber is coming today & I can't wait to show him this!!!!!
Kelsey
10/19/2023 09:52:54 am
Hi Laura! Wow, hauling water from the kitchen sink sounds brutal!! I am so glad this post helped you. One update is we recommend getting an in-floor water heat pump as they run continuously and are USED to doing that. Best of luck to you! Leave a Reply. |

Meet Kelsey,Thanks for stopping by Green Willow Homestead! From chicken rearing to composting, we've got our hands full and we love sharing what we've learned along the way. Follow along as we turn the 80 acres we call home into a farm that serves its community and a homestead that nourishes us throughout the seasons. 
Grab the EbookListen in!
FREE Guide!
Tune in to our YouTube ChannelInspirationsCategories
All
Favorite Books of 20241. Erosion
2. Braiding Sweetgrass 3. As Long As Grass Grows 4. The Small Scale Poultry Flock 5. The Zero Waste Solution Archives
April 2024
|
FOLLOW KELSEY ON INSTAGRAM!
|
|
As an Amazon Associate I earn from qualifying purchases. |
|