|
Now that you are armed with all the planning knowledge to get started with organic gardening, it’s time to start plotting your garden beds. How you plot out your garden has a large effect on your overall success for the growing season. In this blog post, we are going to cover companion planting, square foot gardening, row gardening, and how to mimic nature to give your organic garden some serious edge. All you’ll need is some graph paper, a pencil, and time to dream of all the delicious things you can grow organically!
Companion Planting
Some plants hate being partnered near others. Some adore being next to friendly neighbors. I employed companion planting my first year of organic gardening and fell in love. What is companion planting? Companion plants can enhance the flavor and growth of their neighboring plants. Some companion plants can act as a natural insecticide and fungicide to protect their neighbors. It’s one of the safest and most effective ways to protect your garden organically.
The best way to approach plotting out companion planting is to choose your leading ladies first and then pepper in the supporting characters second. This means list your main crops, like tomatoes, peppers, and zucchini, then cross reference from there what plants they love to be neighbors with. You’ll begin to see overlaps in favorite neighbors, and you can use this knowledge as you start plotting out your beds. Here’s a quick companion planting example: Tomatoes - love basil Peppers - love basil Wait, okay do tomatoes and peppers get along? Yup! Look at that, you can bunch these three buddies together with no problems. Beans - love carrots, cucumbers, and marigolds Cucumbers - love rosemary, radishes, and beans Lettuce - love radishes Zucchini - love oregano Carrots - love parsley There are endless combinations when it comes to pairing up and tripling up vegetables in your garden. Here is a complete list to get you started as you plot your leading ladies. You can see that herbs are often the supporting characters, which is why I am not of the “segregated herb-garden” camp. Those herbs should be scattered throughout your vegetable beds, helping your leading ladies shine! Let’s dive into my personal favorite plants when it comes to companion planting. My Favorite Protective and Flavor Enhancing Companion Plants
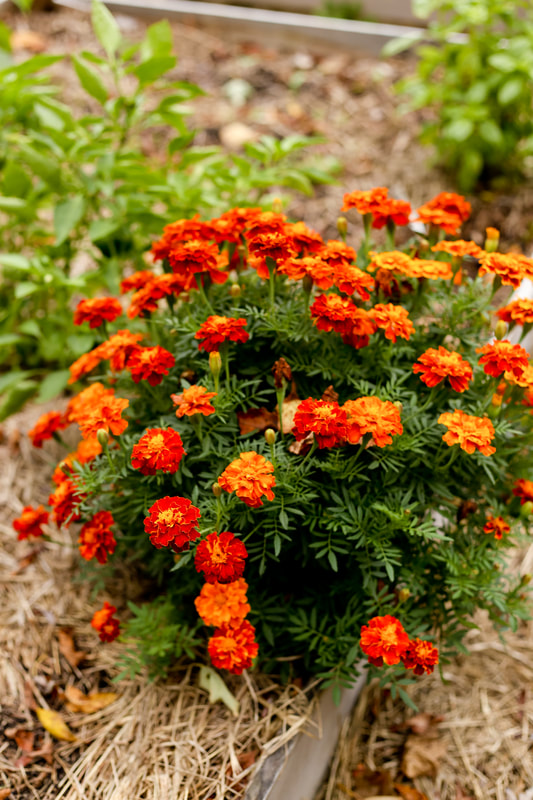
The number one winner of protective companion planting is marigolds. These little bursts of orange awesomeness clean the soil of root-eating microbes and deter numerous plant killing bugs - aphids, squash bugs, bean beetles, tomato hornworms, and whiteflies. Rabbits and deer also despise the marigold’s smell, so you can kiss those greedy nibblers goodbye! Every year I’ve basically surrounded each garden bed with an ample cluster of these powerhouse companion plants.
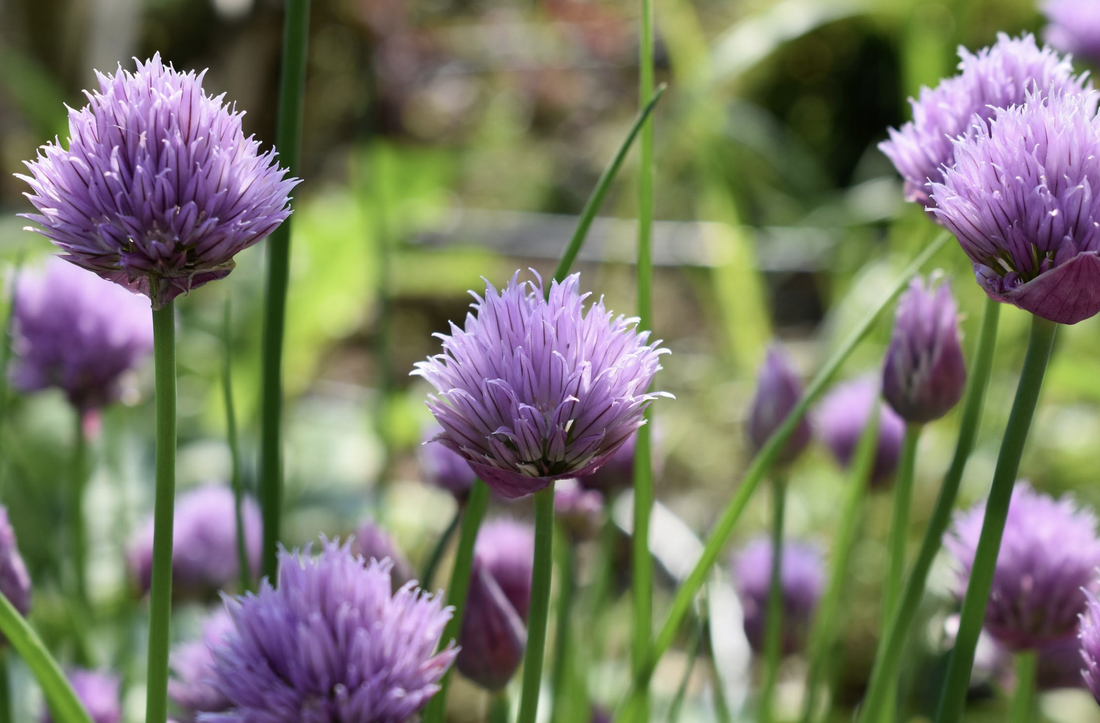
Then we have parsley. This herb is an amazing bestie to many vegetables in the garden including tomatoes, asparagus, peppers, peas, and carrots. However, you want to avoid planting near lettuce or mint. Parsley attracts pollinators without even blooming! Next up is oregano. You can use this herb like the marigold and surround your garden beds with it. Oregano deters many insect pests that munch on vines and leaves. I use it to safeguard my squash, sweet potatoes, pumpkins, and watermelon. Then there are green onions. Green onions deter many insect pests as well. They also help the growth of nearby plants. I plant them alongside my carrots, potatoes, sweet peppers, and radishes. Basil is the next companion plant I utilize. This delicious plant enhances the flavor and growth of tomatoes, peppers, and lettuce, which is why I always team them up in my garden layout. Go team basil! Then we have spearmint. This minty herb is another deterrent because of its smell, mice, ants, and bugs hate it. Since it is a fast grower, it’s a great plant to cut back and then use its clippings as mulch around beets. Mint also enhances the flavor of tomatoes. Beware planting this directly into your garden soil, as mint is technically invasive. Its roots will spread every which way underground and can populate your entire bed if you aren’t careful. To avoid this, plant mint in a few pots and place them throughout your garden beds directly on top the soil. Next up is chives, which are a general insect repellant. Chives are a perennial, meaning they come back everywhere without too much prompting. Put chives in a spot you can give up indefinitely in your garden. Don’t forget they are there though come spring when you prep your beds! This is why it’s important to keep your garden layouts year after year (more on this later). Then we have dill, which enhances the flavor and growth of cabbage. Although it is not technically a perennial, dill readily reseeds itself. I plant dill in a few containers and then move them around the garden accordingly, much like mint, otherwise, I have dill for years to come in spots I may not want it. Another way to avoid dill reseeding itself is to cut the flowering heads back before they go to seed (and use them for pickling). Radishes. These are not only my favorite vegetable of all time (seriously), but they are right up there with marigolds in terms of their pest deterrent abilities. Instead of those pesky miners, rust flies, and cucumber beetles munching on nearby plants, they will munch on the radish leaves, which does no harm to the radish itself. I’ve planted my radishes near cucumbers, beets, carrots, and onions all to enhance their flavor and provide bug protection. On the flipside, there are certain plants that hate being near certain neighbors. Take for example fennel. Fennel is the Oscar the Grouch of the garden. There is nothing this poor grumpy little vegetable can get along with peacefully. We always give fennel its own little spot far away from others, like a permanent time-out. When it comes to other bad neighbors, issues arise with alliums typically, like onions and garlic. The strong aromas and relationship these party of plants have with the soil can make growing conditions harder for some plants. An example being leguminous plants like beans and peas hate all things garlic. The companion plant directory will also give you keep-away warnings, so take heed. Styles Of Plotting For Your Garden
There are limitless ways to layout a garden bed. You can plant in rows, employ square foot gardening, and also mimic nature’s general creative chaos. I want to take you through the organic options available to you and the pros and cons of each.
Planting in Rows
The straight row plotting method is the most common. If you are an extremely organized OCD-type person then this may be the style for you. Row-style gardening was born out of production efficiency. When farmers use horsepower or tractors to plow, seed, and harvest - of course a straight line makes the most sense. Imagine trying to harvest corn if it was planted in concentric circles! I bet that you aren’t gardening for production and selling your first year, so don’t feel like this is the be-all end-all style of garden plotting.
The benefits of row gardening are simple organization, ease of harvest, and aesthetics for those who are more conventional. Organization for row gardening is easy because remembering where you plant specific crops is as simple as writing them down in a line on your graph paper. You can grab one seed packet and go down your row planting without having to work hard to remember what went where and how much. Ease of harvest comes into play when, say, you want a big salad for lunch or to collect green beans for a stir-fry. All your lettuce is in one bed in one row all together. You don’t have to bounce between different beds to gets your pile of green beans together either. As for aesthetics, row gardening looks neat and tidy, whereas mimicking nature can look like a big old mess. If that type of thing bothers you, then row gardening may be for you. The cons of row gardening are pest and disease management. When a hungry bug comes along looking for cucumbers to munch on and they are all lined up in a perfect row, you are giving that insect and all its buddies a one-stop buffet to ruin your crops. On the flip side, when your leading lady crops are scattered among companion plants, the bug’s sense of smell is confused and it can’t go from one meal to another without traveling quite a ways. You can still utilize companion planting with row planting though by alternating rows of a leading lady crop with a supporting character herb. You can also switch up what is in each row. As for disease management, early blight can ruin an entire crop of tomatoes in a single bed, but when you spread your tomatoes out over a few beds your chances for a few plants to survive are much higher. Square Foot Gardening
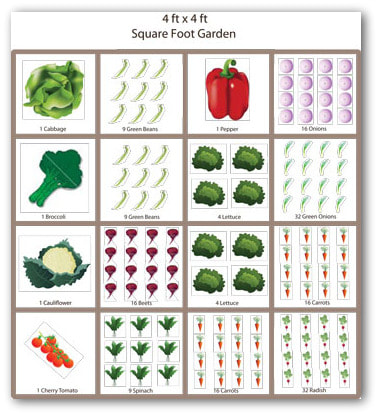
Instead of plotting out vegetables in rows, square foot gardening divides your bed into 12x12” squares, of which each square is intensely planted. This style of gardening is great for those who want a big harvest, but have little space. Each vegetable has a different layout within it’s 12x12” square. An example being radishes can be planted 16 to a square, whereas tomatoes can be planted one to a square. A garden bed can then have many different vegetables all in one place. Here is a complete index of square foot gardening for each vegetable. If you want more in-depth knowledge, this book is the best there is.
The benefits of square foot gardening are high harvest rates despite small gardens, creating a living mulch for your plants with other plants, and being able to companion plant with ease. High harvest rates are achievable as every square within your garden bed is densely planted and not a single part of your garden is wasted. This intensive style of gardening is perfect for those who have one or two raised beds in their backyard but want to have ample fresh vegetables to eat throughout the growing season. With each plant tucked in close to its neighbor, the soil is naturally shaded and mulched, preventing moisture loss and suppressing weed growth. Companion planting is incredibly easy as you just put one square of supporting characters next to its leading lady’s square. The downsides of square foot gardening are that it can be hard to keep track of without serious planning. You will need to grab that graph paper and get fairly detailed within each garden bed you plant. If you are into that type of nutty gritty organization then this style of gardening is definitely for you. The densely planted crops can be easily forgotten about when they are placed in the middle of the bed, so be sure to keep track of harvest times. I always forget about my radishes when I square foot garden. They end up going to seed faster than I can pull them up and I’m left with woody bulbs. If anything, they do their duty as a good companion plant to cucumbers regardless of if I get to eat them! With larger beds, it can be difficult to get to the center of the bed when every inch is planted with something you don’t want to step on, so I recommend square foot gardening for 4x8’ raised beds only. That way you can reach across without stepping into the bed and ruining your lettuce. Mimicking Nature
My favorite quip when it comes debating serious conventional gardeners is Nature doesn’t get any help with planting, fertilizing, and pest control - yet she does just fine! For anyone who has dealt with a weedy patch of land, you can cut it back, spray it, and try your best to make it your own, but Nature usually bounces back with her own plan. When mimicking nature in the garden, there are no such things as rows or square foot gardening. Seeds and transplants are plotted with companion planting as a simple framework and the garden bed is simply a canvas with no rules.
Working in tandem with Nature’s strengths like mixed planting, vertical layers, and ground covers can be a huge boon to your garden. Mixed planting requires intensive planning with graph paper and a pencil so you don’t lose track of what was planted where. You can put tomatoes next to basil and mint and peppers. You can do a patch of lettuce interspersed with bush beans. You can let cucumbers and beans climb the same trellis. Mixed planting is basically companion planting on speed, so you can see why keeping track of what went where is important. With vertical layering, you utilize the natural structures of plants as a boon for their neighbors above and/or below them. Vertical layering is everywhere in our natural ecosystems. Tall forests create microclimates underneath their canopy for cool shade-loving wildflowers and ferns. An example of vertical gardening in agriculture is the infamous three sisters garden. Corn is planted first, then when it is six inches tall you plant pole beans that will climb the corn stalk, using it as a natural trellis. At the same time you plant the beans, you plant squash along the outer perimeter of the corn. As the squash vines outwards toward the sun, it creates a natural mulch for the soil, retaining moisture and suppressing weeds. Tall plants are typically placed on the northernmost side of the garden bed so they don’t shade their sun-loving neighbors. But with vertical layering, you can plant tall plants anywhere as long as they are paired with a shade loving vegetable that needs some shelter from the afternoon sun. A common pairing is placing a few towering tomatoes with lettuce. The tomatoes will shade the lettuce when the sun is overhead, keeping it cool. Ground covers are an extension of the vertical layering method when it comes to mimicking nature. There is no such thing as bare soil in a non-brittle ecosystem (AKA not a sandy desert). Nature finds a way to cover bare earth with fallen leaves, decaying wood, and low lying plants. Fostering the growth of low lying plants in the garden protects the soil from erosion, moisture loss, and keeps unwanted plants at bay. Some great examples of natural ground covers are vining squash, oregano, mints, and lettuce. In the short term, you can achieve ground cover with straw. I always use straw at the beginning of the growing season to keep my bare garden soil covered. The downsides to mimicking nature can be aesthetics, as it looks like chaos when the growing season is in full swing. As mentioned before, it can be easy to lose track of what was planted where and when. So although I’m throwing around the word chaos quite a bit, you still have to be on top of your plan when mimicking nature. No matter what style you are drawn to, you are going to make mistakes. There are going to be disappointments as you get started. Just last week I set out beautiful healthy cabbage seedlings to go in the ground, only to have them wither and die on me on day two as I was hardening them off (getting them acclimated to be outside). You may try one method one year, only to hate it and try another the following year. Organic gardening is an art as much as it is a science and there is no room for dogma. Steal what you find useful and toss what you don’t connect with. Time To Plot Out Your Garden
Grab yourself some graph paper, a ruler, and a pencil with an eraser. Your scale of graph squares per unit of length depends on how detailed you would like to get. Feel free to spitball with this process, no vegetable seeds are in the ground yet so go crazy! You can always pull yourself back and do another round of graph paper drawing if needed (ahem, guilty). Employ what you've learned about companion planting and pollinator-friendly flowers. Try out rows, square foot gardening, or mimicking nature on your graph paper. Visualizing it this way has been so incredibly helpful for me and I know it will be for you too. Be sure to save your graph paper from previous years of gardening so you can reference what was planted where!
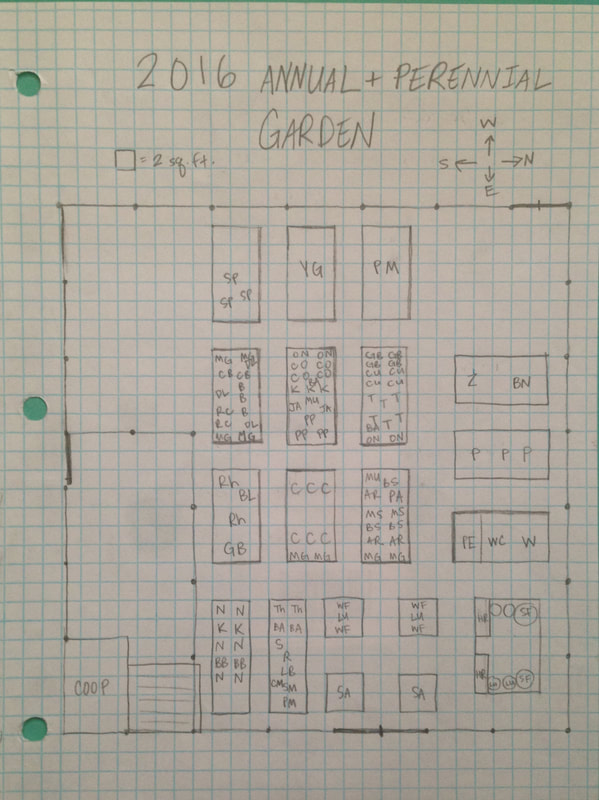
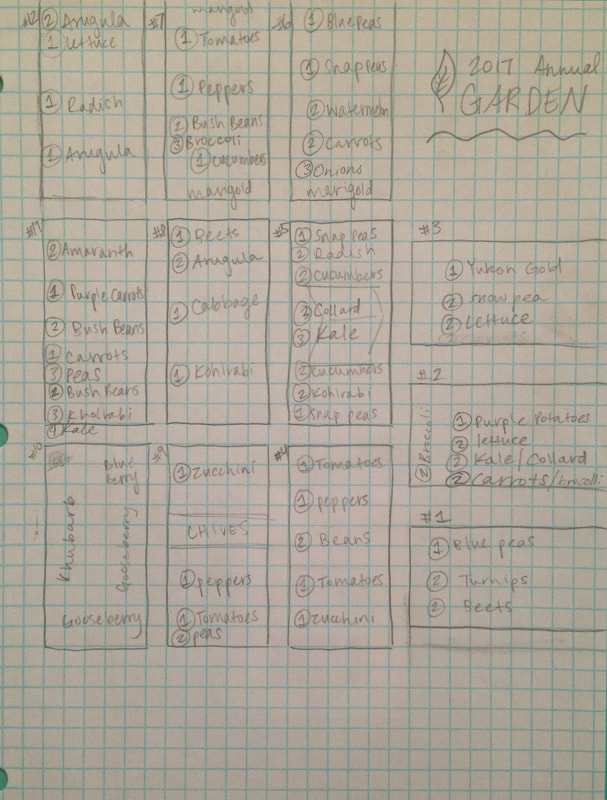
Below, you can check out my garden layouts from 2016 and 2017. I created my own key in 2016 that had certain plants correspond with certain letters. In 2017, I just made do with writing out the full term so I didn't have to reference a separate piece of paper as I was planting. In 2018, I have three phases of planting throughout the season I’m going to try out, i.e. succession planting. The graph paper diagram is wonderful during the growing season so you don't forget what you planted where! It will also come in handy so you don't plant the same thing in the same spot the following year, which insect pests love.
From here, I’ll be taking you through Step 3: Preparing. This will include figuring out where the garden will go, if the soil is in good shape for veggie growing, and what you need to build the basic structure of the garden. Happy plotting and thank you for reading!
1 Comment
|
Meet Kelsey,Thanks for stopping by Green Willow Homestead! From chicken rearing to composting, we've got our hands full and we love sharing what we've learned along the way. Follow along as we turn the 80 acres we call home into a farm that serves its community and a homestead that nourishes us throughout the seasons. Grab the EbookListen in!FREE Guide!Tune in to our YouTube ChannelInspirationsCategories
All
Favorite Books of 20241. Erosion
2. Braiding Sweetgrass 3. As Long As Grass Grows 4. The Small Scale Poultry Flock 5. The Zero Waste Solution Archives
April 2024
|
FOLLOW KELSEY ON INSTAGRAM!
As an Amazon Associate I earn from qualifying purchases. |

