
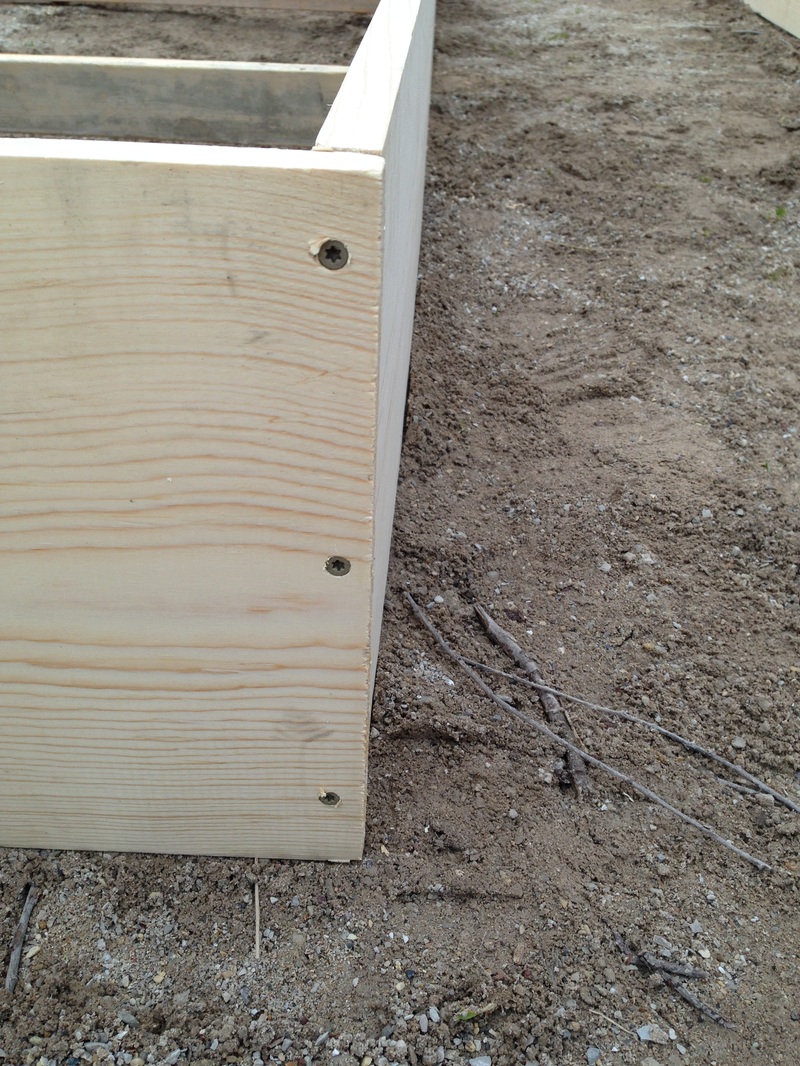
 As you plan your first garden are you running into serious trouble with your soil? Does it hold water like an old sponge or hemorrhage moisture leaving your growing surface bone dry? Don't fear, raised beds are here! I went through a gamut of options as I was trying to deal with my sandbox of a garden spot, literally. There was a 60' x 50' plot of sand where I wanted my garden. Why that spot? With a young forest covering about 60% of our property, I needed a spot with 8+ hours of sunlight and shelter from the wind. This was our only option that wasn't on the opposite end of our five acres. Having your vegetable garden close to your backdoor is imperative. The thought of trekking a wheelbarrow and garden tools all the way to the back of your property seems to me like the opposite of fun. Even if we did put the garden back there, the soil is nearly 70% clay, and the water sits for days before it drains. That is not the type of soil you want for your veggies, unless you want their roots to rot. So back to raised beds. With raised beds, you have much more control over what type of soil you are planting with because you start from scratch. Let's talk how we built ours, what we used to make them, and what their shelf life will be. First and foremost you need to use untreated wood for your raised beds. Treated wood has gotten better since arsenic and chromium was taken out of the formula, but they still contain a hefty amount of copper. There is a lot of research you can look into on the subject, but I went the safe route and used untreated wood. Our goal was to put in 12 raised beds at 5'x10'. The most cost-effective way was to buy 36 1"x12"x10' untreated pine boards. I ordered mine from Home Depot at $10.63 a pop. If you want your beds to last a bit longer, I say opt for 2" thick pine or cedar boards versus the 1" thick. 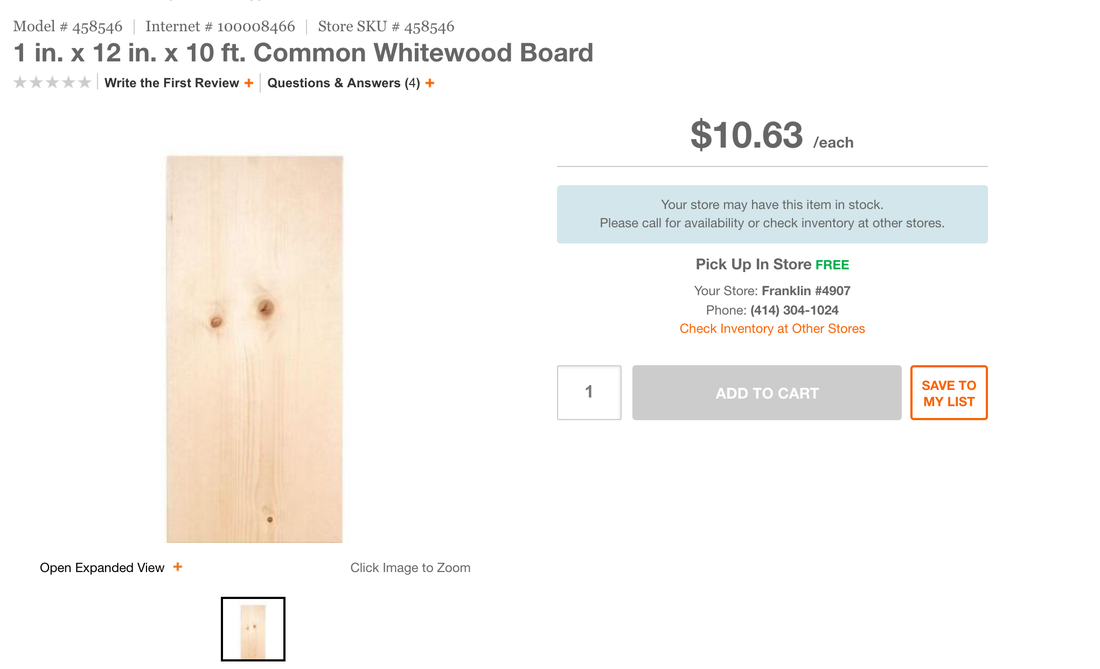 If you want to treat the wood with something safe to prolong its life, I recommend this brand. Personally, I don't want my raised beds to last forever. Eventually, I would like to have just topsoil with no raised beds in my garden spot, so shelf life isn't an issue for me. If you want things to stick around for 5+ years, then go for the Tall Earth Eco-Safe stain. Otherwise, you are looking at about 4 - 5 years out of the pine boards at 1" thick and 5-10 years at 2" thick. This job is definitely a two-person one because it makes the whole assembly process go smoothly and quickly. We were able to cut 12 of the boards in half to be used as the 5' ends, and then used the remaining 24 for the 10' sides. This way we didn't waste any lumber or end up with short pieces we had no immediate use for (although around here scrap lumber always ends up getting used for something). While my dad would cut the boards in half, I would stand on the ends of the 10' boards to secure them. From there we would bring them out to the spot we wanted and assembled the bed. I would hold one 5' piece flush with the 10' piece while my father used the #8 drill bit to drill a hole into the boards. By drilling a hole prior to screwing you lessen your chances of the wood splitting on you. With 1" thick boards, this is especially important! As I would hold the two pieces flush together my dad drilled three holes. See below! 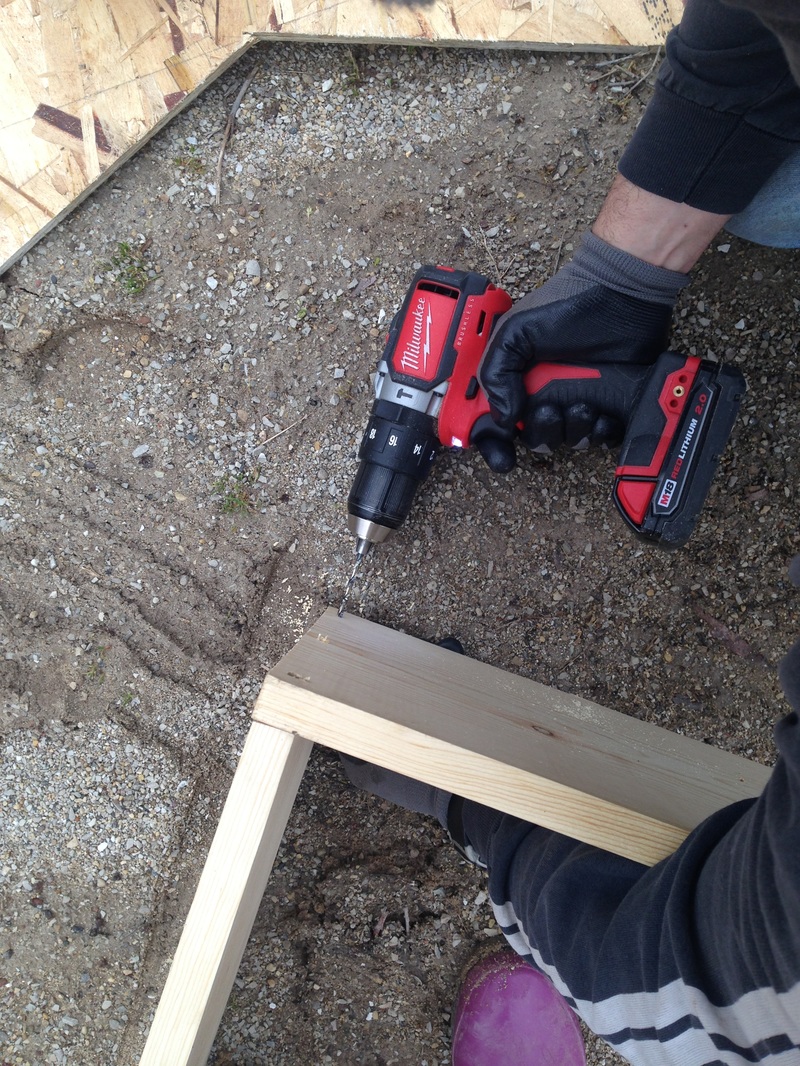 While I was still holding the two pieces together, my dad would sink the uppermost screw first and then work his way down.
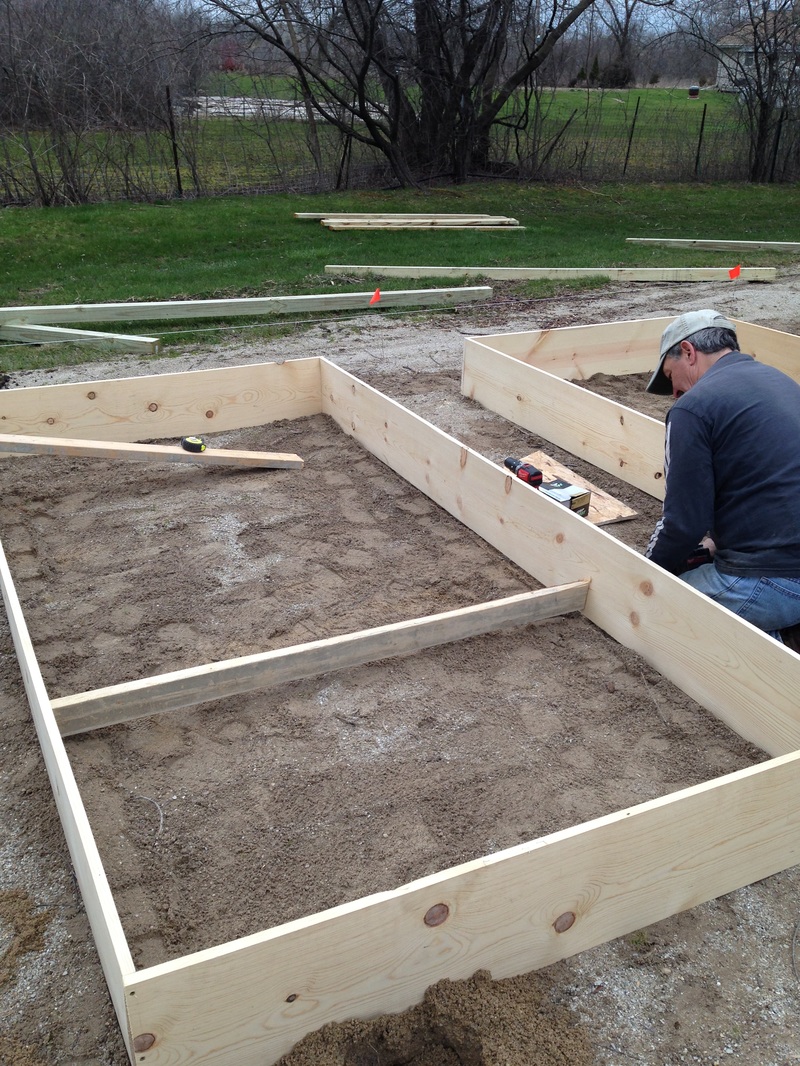
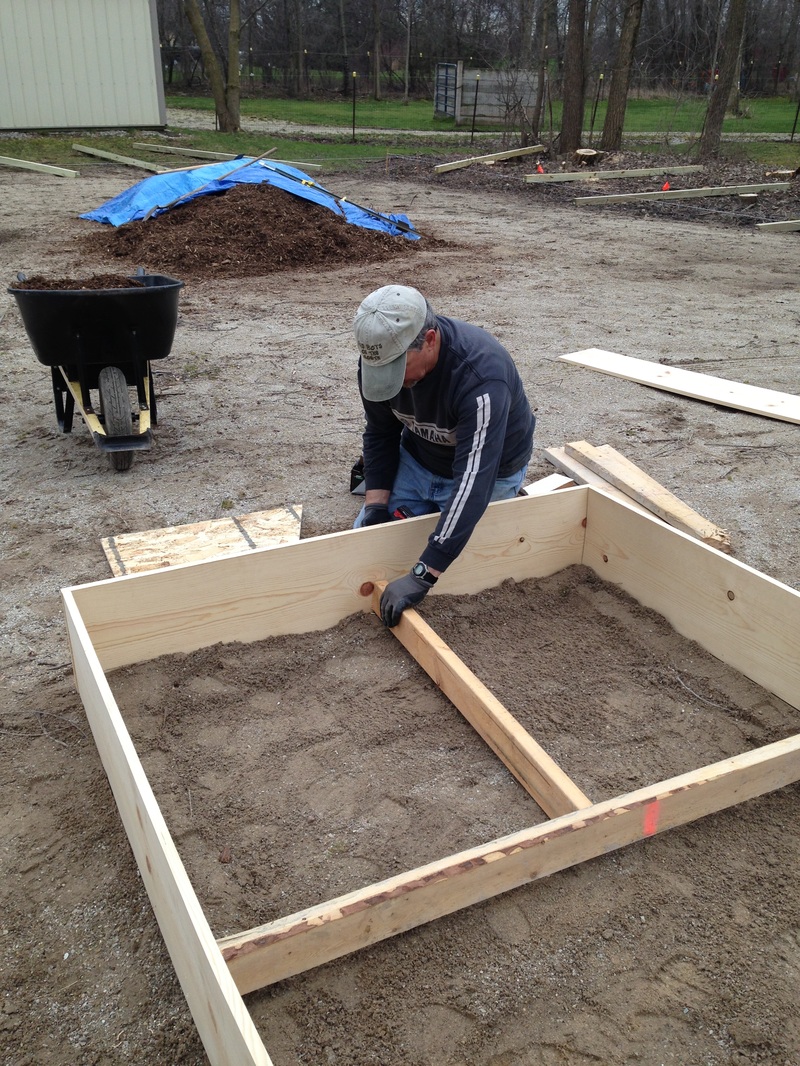
Once we secured all four corners, we arranged the bed where we wanted it. With all four corners secure, it was much easier to get an idea of where they should go and how they should be arranged. 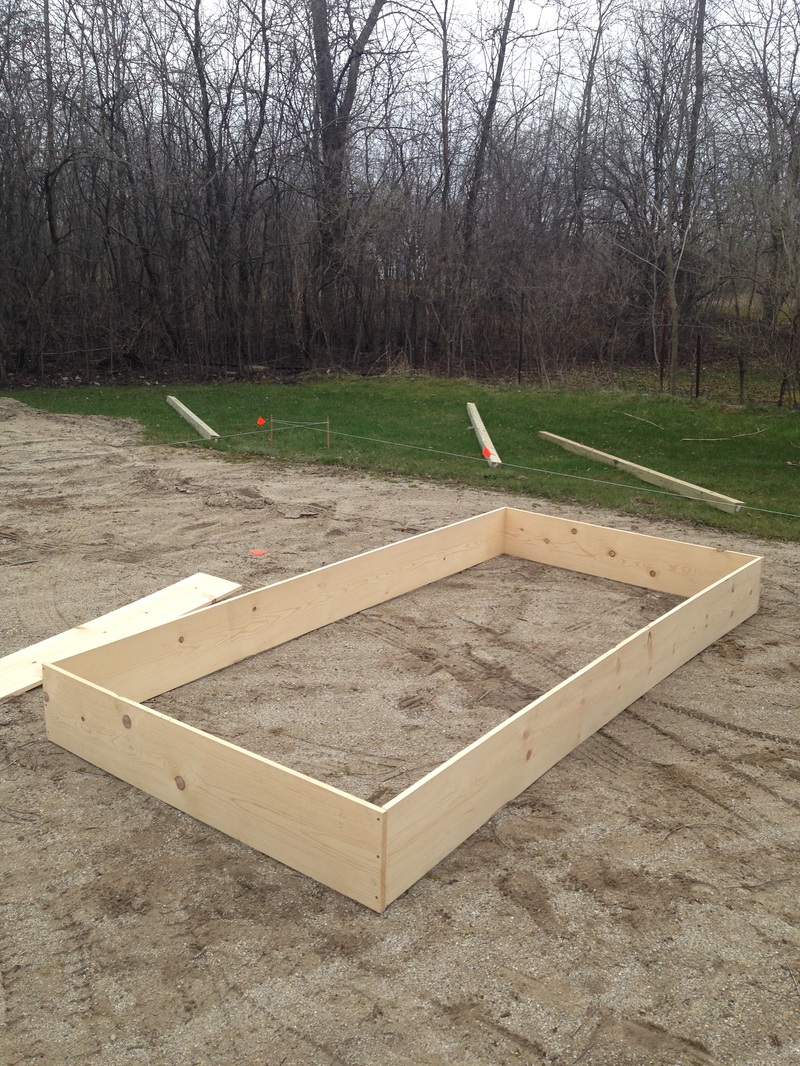 The next phase of building the beds is reinforcing them. Our original plan was to sink stakes into the ground on all four sides to keep the boards from bowing outwards. With all that wet soil inside them, they are bound to bend and flex a bit, but by reinforcing them you can prolong their life. Unfortunately, there are fist-sized rocks about 1' down below the sand, so driving stakes for 12 boxes was impossible. My father came up with a great idea to reinforce them from the inside, phew! We used 2"x4" studs, cut two to 58" long, and two to 3' long studs. We installed the two 58" studs 3 feet in from both sides along the 10' boards. Then we used the 3' studs to create a "T" that connects the 5' board to the 58" stud. Below you can see my dad first installing the 58" long stud, and then the 3' stud. We used 3.5" #8 screws to secure the studs on all four sides.
From there we double checked that all the beds were equal distance from one another. I suggest about 3 feet apart. That way, you can get a wheelbarrow through without too much trouble. Below is a bird's eye view diagram for reference. 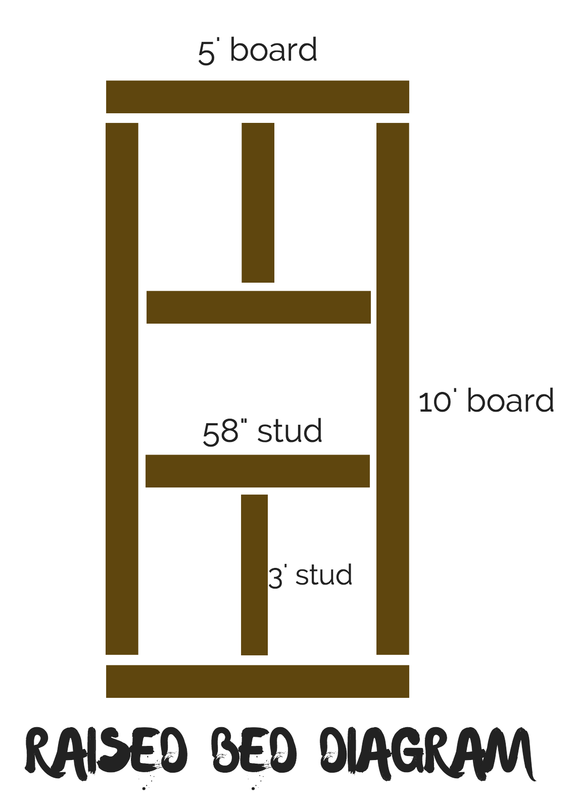 After we filled the beds. I went back through and reinforced the corners with two more screws in between the three, just for good measure. 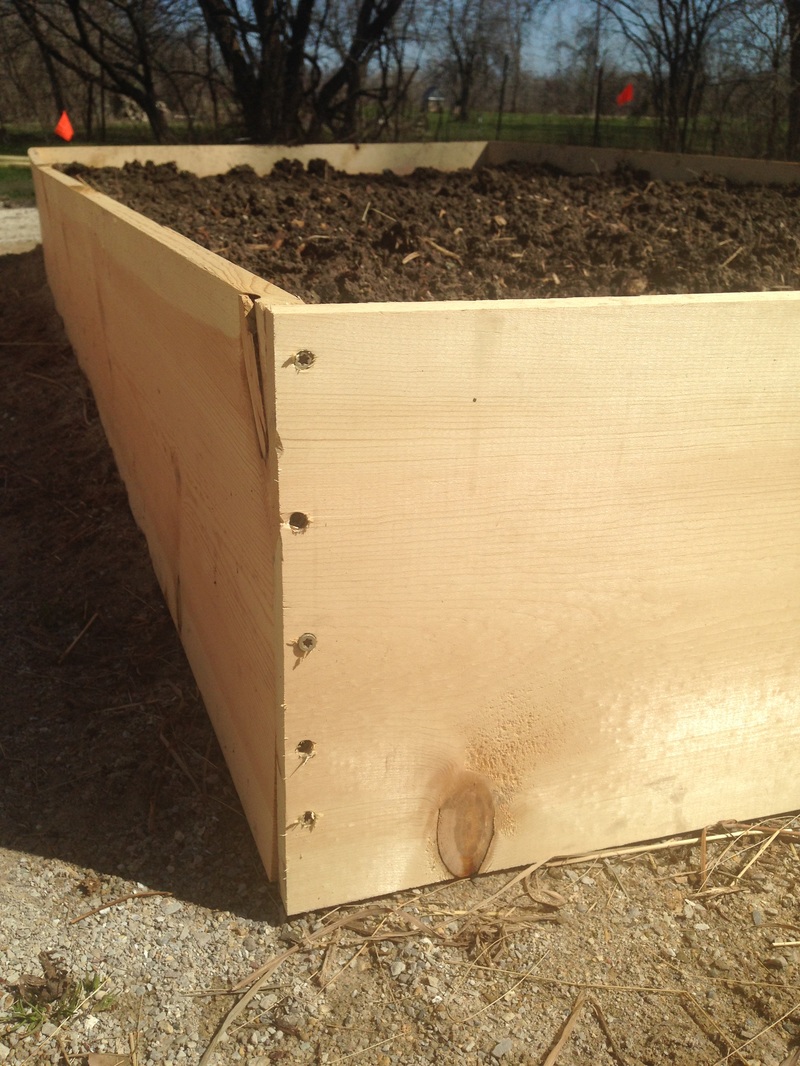 When it comes to tools and supplies we used:
In total, all 12 raised beds cost me about $450, at $37.50 per bed. Mind you I put in TWELVE raised beds. Most people are looking to do somewhere around four. That's pretty cost effective considering you can grow two seasons' worth of food in 4 raised beds. Whenever things get a tad expensive on this homesteading journey, I just remind myself of the $6000 a year we spend on groceries. By building the foundation for a beautiful garden we are offsetting that cost for years to come. Any suggestions on building raised beds? Leave a comment below! 
0 Comments
Leave a Reply. |
Meet Kelsey,Thanks for stopping by Green Willow Homestead! From chicken rearing to composting, we've got our hands full and we love sharing what we've learned along the way. Follow along as we turn the 80 acres we call home into a farm that serves its community and a homestead that nourishes us throughout the seasons. 
Grab the EbookListen in!
FREE Guide!
Tune in to our YouTube ChannelInspirationsCategories
All
Favorite Books of 20241. Erosion
2. Braiding Sweetgrass 3. As Long As Grass Grows 4. The Small Scale Poultry Flock 5. The Zero Waste Solution Archives
April 2024
|

FOLLOW KELSEY ON INSTAGRAM!
|
|
As an Amazon Associate I earn from qualifying purchases. |
|